from PyQt5.QtWidgets import *
import threading
import sys
from PyQt5.QtCore import *
from PyQt5.QtWidgets import QFileDialog, QMessageBox, QDockWidget, QListWidget
from PyQt5.QtGui import *
import face_recognition
import cv2
import os
import face_recognition_models
import cv2
import locale
locale.setlocale(locale.LC_ALL, 'zh_CN.UTF-8')
def enhance_image_quality(image):
# 增强对比度
alpha = 1.5 # 调整对比度的参数
beta = 30 # 调整亮度的参数
enhanced_image = cv2.convertScaleAbs(image, alpha=alpha, beta=beta)
return enhanced_image
# 窗口主类
class MainWindow(QTabWidget):
# 基本配置不动,然后只动第三个界面
def __init__(self):
# 初始化设置
super().__init__()
self.setWindowTitle('实时人脸识别系统')
self.resize(1100, 650)
self.setWindowIcon(QIcon("UI_images/faxian.png"))
# 要上传的图片路径
self.up_img_name = ""
# 要检测的图片名称
self.input_fname = ""
# 要检测的视频名称
self.source = ''
self.video_capture = cv2.VideoCapture(0)
# 初始化中止事件
self.stopEvent = threading.Event()
self.stopEvent.clear()
# 初始化人脸向量
self.known_names, self.known_encodings = self.initFaces()
# 加载lbp检测器
# 加载人脸识别模型
# 初始化界面
self.initUI()
self.set_down()
# 初始化数据库的人脸
def initFaces(self):
# 存储知道人名列表
known_names = []
# 存储知道的特征值
known_encodings = []
# 遍历存储人脸图片的文件夹
db_folder = "images/db_faces"
face_imgs = os.listdir(db_folder)
# 加载更复杂的人脸识别模型
face_rec_model = "cnn" # 使用深度学习模型,通常更准确
# 遍历图片,将人脸图片转化为向量
for face_img in face_imgs:
face_img_path = os.path.join(db_folder, face_img)
face_name = face_img.split(".")[0]
load_image = face_recognition.load_image_file(face_img_path) # 加载图片
image_face_encoding = face_recognition.face_encodings(load_image, model=face_rec_model)[0] # 获得128维特征值
known_names.append(face_name) # 添加到人名的列表
known_encodings.append(image_face_encoding) # 添加到向量的列表
return known_names, known_encodings
# 在 up_img 函数中添加图像预处理步骤
def up_img(self):
# 打开文件选择框
openfile_name = QFileDialog.getOpenFileName(self, '选择文件', '', 'Image files(*.jpg , *.png)')
# 获取上传的文件名称
img_name = openfile_name[0]
if img_name == '':
pass
else:
# 上传之后显示并做归一化处理
src_img = cv2.imread(img_name)
src_img = enhance_image_quality(src_img) # 增强图像质量
src_img_height = src_img.shape[0]
src_img_width = src_img.shape[1]
target_img_height = 400
ratio = target_img_height / src_img_height
target_img_width = int(src_img_width * ratio)
# 将图片统一处理到高为400的图片,方便在界面上显示
target_img = cv2.resize(src_img, (target_img_width, target_img_height))
cv2.imwrite("UI_images/tmp/toup.jpg", target_img)
self.img_f_img.setPixmap(QPixmap("UI_images/tmp/toup.jpg"))
self.up_img_name = "UI_images/tmp/toup.jpg"
def open_local(self):
# 选择录像文件进行读取
mp4_filename = 0
self.source = mp4_filename
self.video_capture = cv2.VideoCapture(self.source)
# 设置摄像头分辨率
self.video_capture.set(cv2.CAP_PROP_FRAME_WIDTH, 640)
self.video_capture.set(cv2.CAP_PROP_FRAME_HEIGHT, 480)
th = threading.Thread(target=self.display_video)
th.start()
# 初始化界面
def initUI(self):
# 设置字体
font_v = QFont('楷体', 14)
generally_font = QFont('楷体', 15)
# 图片检测
img_widget = QWidget()
img_layout = QVBoxLayout()
img_f_title = QLabel("上传人脸图像") # 设置标题
img_f_title.setAlignment(Qt.AlignCenter) # 设置标题位置为居中
img_f_title.setFont(QFont('楷体', 18)) # 设置标题字体大小
# todo 要上传的人脸图像
self.img_f_img = QLabel() # 设置第一个界面上要显示的图片
self.img_f_img.setPixmap(QPixmap("UI_images/zhuye.jpeg")) # 初始化要显示的图片
self.img_f_img.setAlignment(Qt.AlignCenter) # 设置图片居中
# 创建一个表单布局来包含提示文本和人名输入框
form_layout = QFormLayout()
name_label = QLabel("请输入姓名: ") # 添加提示文本
self.face_name = QLineEdit() # 设置当前图片对应的人名
form_layout.addRow(name_label, self.face_name) # 将提示文本和输入框添加到表单布局
# 创建一个水平布局来包含"上传图片"按钮和"开始上传"按钮
buttons_layout = QHBoxLayout()
img_up_btn = QPushButton("上传图片") # 设置上传图片的按钮
img_det_btn = QPushButton("开始上传") # 设置开始上传的按钮
img_up_btn.clicked.connect(self.up_img) # 联系到相关函数
img_det_btn.clicked.connect(self.up_db_img) # 连接到相关函数
# 设置组件的样式
img_up_btn.setFont(generally_font)
img_det_btn.setFont(generally_font)
img_up_btn.setStyleSheet("QPushButton{color:white}"
"QPushButton:hover{background-color: rgb(2,110,180);}"
"QPushButton{background-color:rgb(48,124,208)}"
"QPushButton{border:2px}"
"QPushButton{border-radius:5px}"
"QPushButton{padding:5px 5px}"
"QPushButton{margin:5px 5px}")
img_det_btn.setStyleSheet("QPushButton{color:white}"
"QPushButton:hover{background-color: rgb(2,110,180);}"
"QPushButton{background-color:rgb(48,124,208)}"
"QPushButton{border:2px}"
"QPushButton{border-radius:5px}"
"QPushButton{padding:5px 5px}"
"QPushButton{margin:5px 5px}")
# 将组件添加到布局上,然后设置主要的widget为当前的布局
img_layout.addWidget(img_f_title)
img_layout.addWidget(self.img_f_img)
img_layout.addLayout(form_layout) # 添加表单布局到垂直布局
buttons_layout.addWidget(img_up_btn) # 添加按钮到水平布局
buttons_layout.addWidget(img_det_btn) # 添加按钮到水平布局
img_layout.addLayout(buttons_layout) # 添加水平布局到垂直布局
img_widget.setLayout(img_layout)
'''
*** 4. 视频识别界面 ***
'''
video_widget = QWidget()
video_layout = QVBoxLayout()
# 设置视频识别区的标题
self.video_title2 = QLabel("摄像头/视频识别区")
self.video_title2.setFont(font_v)
self.video_title2.setAlignment(Qt.AlignCenter)
self.video_title2.setFont(font_v)
# 设置显示的界面
self.DisplayLabel = QLabel()
self.DisplayLabel.setPixmap(QPixmap(""))
self.btn_open_rsmtp = QPushButton("人脸检测摄像头")
self.btn_open_rsmtp.setFont(font_v)
# 设置打开摄像头的按钮和样式
self.btn_open_rsmtp.setStyleSheet("QPushButton{color:white}"
"QPushButton:hover{background-color: rgb(2,110,180);}"
"QPushButton{background-color:rgb(48,124,208)}"
"QPushButton{border:2px}"
"QPushButton{border-radius:5px}"
"QPushButton{padding:5px 5px}"
"QPushButton{margin:5px 5px}")
# 设置选择文件的的按钮和样式
self.btn_open = QPushButton("开始识别(选择文件)")
self.btn_open.setFont(font_v)
self.btn_open.setStyleSheet("QPushButton{color:white}"
"QPushButton:hover{background-color: rgb(2,110,180);}"
"QPushButton{background-color:rgb(48,124,208)}"
"QPushButton{border:2px}"
"QPushButton{border-radius:5px}"
"QPushButton{padding:5px 5px}"
"QPushButton{margin:5px 5px}")
# 设置结束演示的按钮和样式
self.btn_close = QPushButton("结束检测")
self.btn_close.setFont(font_v)
self.btn_close.setStyleSheet("QPushButton{color:white}"
"QPushButton:hover{background-color: rgb(2,110,180);}"
"QPushButton{background-color:rgb(48,124,208)}"
"QPushButton{border:2px}"
"QPushButton{border-radius:5px}"
"QPushButton{padding:5px 5px}"
"QPushButton{margin:5px 5px}")
# 将组件添加到布局上
self.btn_open_rsmtp.clicked.connect(self.open_local)
self.btn_open.clicked.connect(self.open)
self.btn_close.clicked.connect(self.close)
video_layout.setAlignment(Qt.AlignCenter)
video_layout.addWidget(self.video_title2)
video_layout.addWidget(self.DisplayLabel)
self.DisplayLabel.setAlignment(Qt.AlignCenter)
video_layout.addWidget(self.btn_open_rsmtp)
video_layout.addWidget(self.btn_open)
video_layout.addWidget(self.btn_close)
video_widget.setLayout(video_layout)
'''
*** 5. 关于界面 ***
'''
about_widget = QWidget()
about_layout = QVBoxLayout()
about_title = QLabel('欢迎使用人脸检测系统\n\n') # todo 修改欢迎词语
about_title.setFont(QFont('楷体', 18))
about_title.setAlignment(Qt.AlignCenter)
about_img = QLabel()
about_img.setPixmap(QPixmap('UI_images/san.png'))
about_img.setAlignment(Qt.AlignCenter)
# label4.setText("<a href='https://oi.wiki/wiki/学习率的调整'>如何调整学习率</a>")
label_super = QLabel() # todo 更换作者信息
label_super.setText("<a href='https://wcowin.work/'>-->联系我们</a>")
label_super.setFont(QFont('楷体', 16))
label_super.setOpenExternalLinks(True)
# label_super.setOpenExternalLinks(True)
label_super.setAlignment(Qt.AlignRight)
about_layout.addWidget(about_title)
about_layout.addStretch()
about_layout.addWidget(about_img)
about_layout.addStretch()
about_layout.addWidget(label_super)
about_widget.setLayout(about_layout)
# 分别添加子页面
self.addTab(img_widget, "上传人脸")
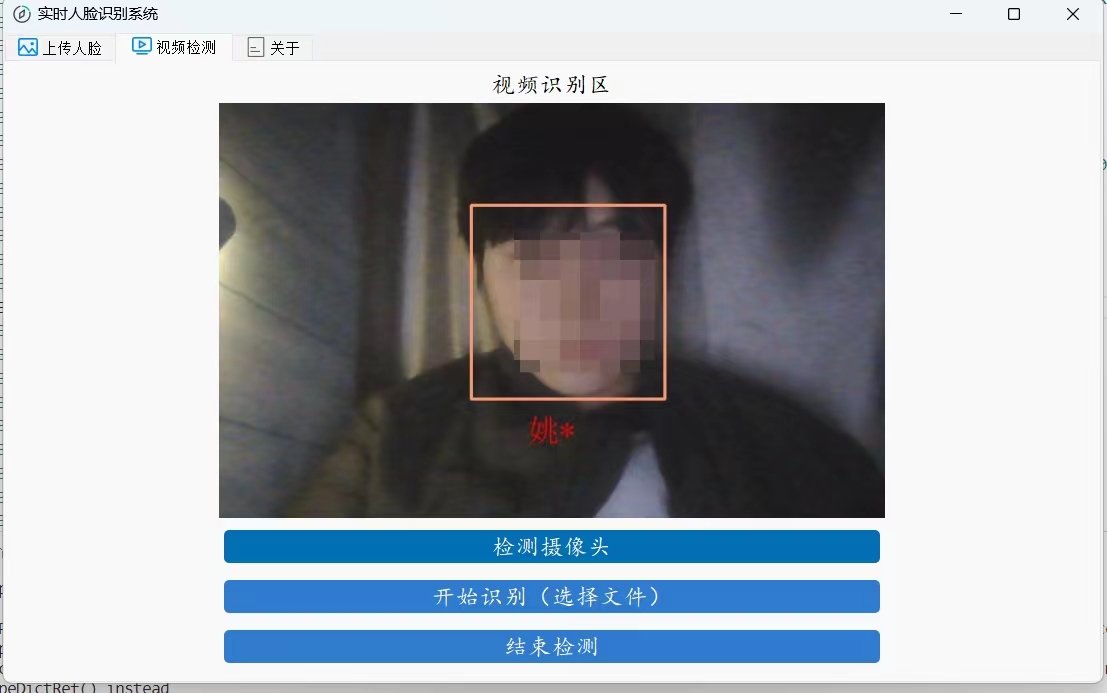
self.addTab(video_widget, '视频检测')
self.addTab(about_widget, '关于')
self.setTabIcon(0, QIcon('UI_images/图片.png'))
self.setTabIcon(1, QIcon('UI_images/图片.png'))
self.setTabIcon(1, QIcon('UI_images/直播.png'))
self.setTabIcon(2, QIcon('UI_images/logo_about.png'))
# 第一个界面的函数
def up_img(self):
# 打开文件选择框
openfile_name = QFileDialog.getOpenFileName(self, '选择文件', '', 'Image files(*.jpg , *.png)')
# 获取上传的文件名称
img_name = openfile_name[0]
if img_name == '':
pass
else:
# 上传之后显示并做归一化处理
src_img = cv2.imread(img_name)
src_img_height = src_img.shape[0]
src_img_width = src_img.shape[1]
target_img_height = 400
ratio = target_img_height / src_img_height
target_img_width = int(src_img_width * ratio)
# 将图片统一处理到高为400的图片,方便在界面上显示
target_img = cv2.resize(src_img, (target_img_width, target_img_height))
cv2.imwrite("UI_images/tmp/toup.jpg", target_img)
self.img_f_img.setPixmap(QPixmap("UI_images/tmp/toup.jpg"))
self.up_img_name = "UI_images/tmp/toup.jpg"
def up_db_img(self):
# 首先判断该图像是否有一个人脸,多个人脸或者没有人脸都不行
face_name = self.face_name.text()
if face_name == "":
QMessageBox.information(self, "不能为空", "请填写人脸姓名")
else:
load_image = face_recognition.load_image_file(self.up_img_name) # 加载图片
image_face_encoding = face_recognition.face_encodings(load_image) # 获得128维特征值
encoding_length = len(image_face_encoding) # 获取人脸得数量
if encoding_length == 0: # 如果没有人脸,提示用户重新上传
QMessageBox.information(self, "请重新上传", "当前图片没有发现人脸")
elif encoding_length > 1: # 如果人脸有多个,也提示用户重新上传
QMessageBox.information(self, "请重新上传", "当前图片发现多张人脸")
else:
face_encoding = image_face_encoding[0] # 获取解析得到得人脸数量
img = cv2.imread(self.up_img_name) # 将上传得图片保存在db目录下
img_path = face_name + '.jpg'
cv2.imwrite("images/db_faces/" + img_path, img)
# 上传之后重新对字典进行处理
self.known_names.append(face_name)
self.known_encodings.append(face_encoding)
QMessageBox.information(self, "上传成功", "数据已上传!")
'''
### 3. 视频识别相关功能 ###
'''
# 关闭事件 询问用户是否退出
def closeEvent(self, event):
reply = QMessageBox.question(self,
'退出',
"是否要退出程序?",
QMessageBox.Yes | QMessageBox.No,
QMessageBox.No)
if reply == QMessageBox.Yes:
self.close()
event.accept()
else:
event.ignore()
# 读取录像文件
def open(self):
# 选择录像文件进行读取
mp4_fileName, fileType = QFileDialog.getOpenFileName(self, 'Choose file', '', '*.mp4')
if mp4_fileName:
# 启动录像文件读取得线程并在画面上实时显示
self.source = mp4_fileName
self.video_capture = cv2.VideoCapture(self.source)
th = threading.Thread(target=self.display_video)
th.start()
def open_local(self):
# 选择录像文件进行读取
mp4_filename = 0
self.source = mp4_filename
# 读取摄像头进行实时得显示
self.video_capture = cv2.VideoCapture(self.source)
th = threading.Thread(target=self.display_video)
th.start()
# 退出进程
def close(self):
# 点击关闭按钮后重新初始化界面
self.stopEvent.set()
self.set_down()
# todo 执行人脸识别主进程
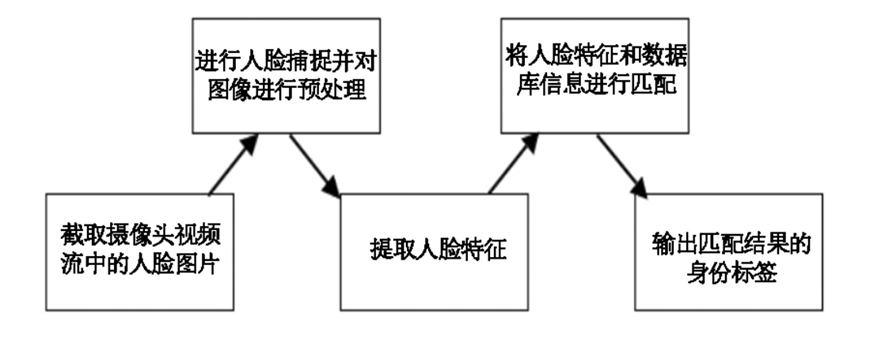
def display_video(self):
self.btn_open.setEnabled(False)
self.btn_close.setEnabled(True)
process_this_frame = True
while True:
ret, frame = self.video_capture.read()
rgb_frame = cv2.cvtColor(frame, cv2.COLOR_BGR2RGB)
if process_this_frame:
face_locations = face_recognition.face_locations(rgb_frame)
face_encodings = face_recognition.face_encodings(rgb_frame, face_locations)
face_names = []
for face_encoding in face_encodings:
matches = face_recognition.compare_faces(self.known_encodings, face_encoding, tolerance=0.5)
if True in matches:
first_match_index = matches.index(True)
name = self.known_names[first_match_index]
else:
name = "Unknown"
face_names.append(name)
process_this_frame = not process_this_frame
for (top, right, bottom, left), name in zip(face_locations, face_names):
cv2.rectangle(frame, (left, top), (right, bottom), (0, 0, 255), 2) # 修改边界框颜色为红色
cv2.rectangle(frame, (left, bottom - 35), (right, bottom), (0, 0, 255), cv2.FILLED) # 修改填充颜色为红色
font = cv2.FONT_HERSHEY_DUPLEX
cv2.putText(frame, name, (left + 6, bottom - 6), font, 1.0, (255, 255, 255), 1)
frame = frame
frame_height = frame.shape[0]
frame_width = frame.shape[1]
frame_scale = 500 / frame_height
frame_resize = cv2.resize(frame, (int(frame_width * frame_scale), int(frame_height * frame_scale)))
cv2.imwrite("images/tmp.jpg", frame_resize)
self.DisplayLabel.setPixmap(QPixmap("images/tmp.jpg"))
if cv2.waitKey(25) & self.stopEvent.is_set() == True:
self.stopEvent.clear()
self.DisplayLabel.clear()
self.btn_close.setEnabled(False)
self.btn_open.setEnabled(True)
self.set_down()
break
self.btn_open.setEnabled(True)
self.btn_close.setEnabled(False)
self.set_down()
# 初始化视频检测界面
def set_down(self):
self.video_capture.release()
cv2.destroyAllWindows()
self.DisplayLabel.setPixmap(QPixmap("UI_images/dier.jpeg"))
# https://www.lfd.uci.edu/~gohlke/pythonlibs/
# https://pypi.org/project/dlib/#files
# https://download.csdn.net/download/ECHOSON/75224362
if __name__ == "__main__":
# 加载页面
app = QApplication(sys.argv)
mainWindow = MainWindow()
mainWindow.show()
sys.exit(app.exec_())