GitHub Pages 部署(推荐)
使用 GitHub Pages 免费托管你的 Zensical 网站 - 最简单、最推荐的部署方式
什么是 GitHub Pages?
GitHub Pages 是 GitHub 提供的免费静态网站托管服务:
- ✅ 完全免费 - 无需任何费用
- ✅ 自动 HTTPS - 免费 SSL 证书
- ✅ 自定义域名 - 支持绑定域名
- ✅ GitHub 集成 - 与仓库无缝集成
- ✅ 简单易用 - 推送即部署
准备工作
在开始之前,确保你已经:
- 拥有 GitHub 账号
- 创建了 Zensical 项目
- 将项目推送到 GitHub 仓库
方法一:使用 GitHub Actions 自动部署(推荐)
第一步:创建 GitHub Actions 工作流
在项目根目录创建 .github/workflows/docs.yml 文件。
创建目录结构:
# 在项目根目录执行
mkdir -p .github/workflows
创建工作流文件:
使用你喜欢的编辑器创建 .github/workflows/docs.yml 文件,复制以下内容:
name: Documentation

on:
  push:
    branches:
      - master
      - main

permissions:
  contents: read
  pages: write
  id-token: write

jobs:
  deploy:
    environment:
      name: github-pages
      url: ${{ steps.deployment.outputs.page_url }}
    runs-on: ubuntu-latest
    steps:
      - uses: actions/configure-pages@v5
      - uses: actions/checkout@v5
      - uses: actions/setup-python@v5
        with:
          python-version: 3.x   # Zensical 需 Python 3.10+,3.x 在 GitHub 当前 runner 上满足要求
      - run: pip install zensical
      - run: zensical build --clean
      - uses: actions/upload-pages-artifact@v4
        with:
          path: site
      - uses: actions/deploy-pages@v4
        id: deployment
关于缓存
目前,我们不推荐在 CI 系统中使用缓存,因为缓存功能将在我们优化 Zensical 性能时进行修订。
检查文件结构:
创建完成后,检查一下目录结构:
# 查看目录结构
tree -a .github
# 或
ls -la .github/workflows/
应该看到:
.github/
└── workflows/
    └── docs.yml
目录树状图:
$ tree -a
xx
├── .github
│   ├── .DS_Store
│   └── workflows
│       └── docs.yml
├── docs
│   ├── index.md
│   └── ...
├── zensical.toml
└── ...
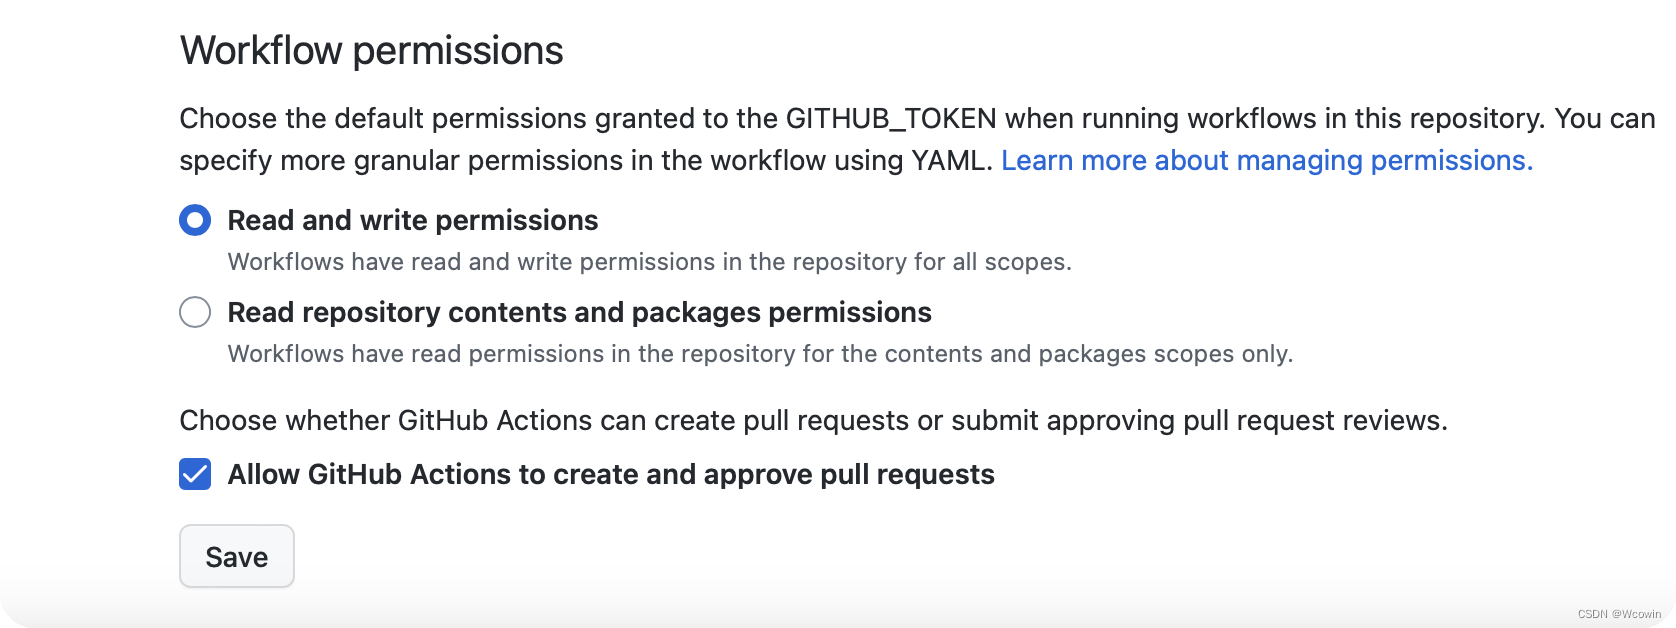
重点来了
Github仓库setings/Actions/General 勾选这两项
第二步:配置 GitHub Pages
在推送代码之前,需要先在 GitHub 仓库中启用 Pages 功能:
- 进入仓库设置
- 打开你的 GitHub 仓库
-
点击
Settings(设置)标签 -
启用 Pages
- 在左侧菜单中找到
Pages - 在
Source部分,选择GitHub Actions
重要
必须选择 GitHub Actions 作为源,而不是 Deploy from a branch。这是使用 GitHub Actions 部署的关键步骤。
第三步:推送代码触发部署
将工作流文件添加到 Git 并推送:
# 添加文件
git add .github/workflows/docs.yml

# 提交更改
git commit -m "Add GitHub Actions workflow for Pages"

# 推送到 GitHub
git push origin main
# 或 git push origin master(根据你的默认分支)
第四步:查看部署状态
- 查看 Actions 运行状态
- 在仓库页面点击
Actions标签 - 你应该能看到一个新的工作流运行
-
点击运行查看详细日志
-
等待部署完成
- 通常需要 1-3 分钟
- 看到绿色的 ✓ 表示部署成功
-
如果失败,点击查看错误日志
-
访问网站
- 部署成功后,在
Settings > Pages中可以看到网站 URL - 格式:
https://你的用户名.github.io/仓库名/ - 如果是
用户名.github.io仓库,URL 是:https://你的用户名.github.io/
示例:
- 仓库名:
my-blog,用户名:zhangsan - 网站 URL:
https://zhangsan.github.io/my-blog/ - 如果是
zhangsan.github.io仓库,URL:https://zhangsan.github.io/
首次部署
首次部署可能需要等待几分钟,GitHub 需要时间来设置 Pages 环境。如果第一次失败,可以重新运行 Actions。
方法二:手动部署
第一步:构建网站
在本地构建网站:
zensical build
第二步:创建 gh-pages 分支
# 创建并切换到 gh-pages 分支
git checkout --orphan gh-pages

# 删除所有文件
git rm -rf .

# 复制构建文件
cp -r site/* .

# 添加 .nojekyll 文件(禁用 Jekyll)
touch .nojekyll

# 提交
git add .
git commit -m "Deploy to GitHub Pages"

# 推送
git push origin gh-pages
第三步:配置 GitHub Pages
- 进入 GitHub 仓库设置
- 点击 Settings → Pages
- 在 Source 下选择 Deploy from a branch
- 选择 gh-pages 分支和 / (root) 目录
- 点击 Save
配置自定义域名
第一步:添加 CNAME 文件
在 docs/ 目录下创建 CNAME 文件:
example.com
或者在 zensical.toml 中配置:
[project]
site_url = "https://example.com"
第二步:配置 DNS
在域名注册商处添加以下 DNS 记录:
使用 A 记录(推荐)
下面任意选择一个A记录,把下面的值填入到你的域名注册商处
| 类型 | 名称 | 值 |
|---|---|---|
| A | @ | 185.199.108.153 |
| A | @ | 185.199.109.153 |
| A | @ | 185.199.110.153 |
| A | @ | 185.199.111.153 |
使用 CNAME 记录
| 类型 | 名称 | 值 |
|---|---|---|
| CNAME | www | username.github.io |
所以你应该最终是两条DNS记录
| 类型 | 名称 | 值 |
|---|---|---|
| A | @ | 185.199.108.153 |
| CNAME | www | username.github.io |
第三步:在 GitHub 设置自定义域名
- 进入 Settings → Pages
- 在 Custom domain 输入你的域名
- 点击 Save
- 等待 DNS 检查通过
- 勾选 Enforce HTTPS
DNS 生效时间
DNS 记录修改后,可能需要 24-48 小时才能完全生效。
配置 site_url(重要)
如果你的网站部署在子路径(如 https://username.github.io/repository/),必须在 zensical.toml 中配置 site_url:
[project]
site_name = "我的博客"
site_url = "https://username.github.io/repository/"  # 注意末尾的斜杠
为什么需要配置 site_url?
- 即时导航需要 - 如果启用了即时导航,必须设置正确的
site_url - 资源路径正确 - CSS、JS 等资源文件路径需要正确的 base URL
- 链接正确生成 - 所有内部链接都需要正确的 base URL
- RSS 订阅 - RSS 链接需要完整的 URL
配置示例:
# 子路径部署(如 username.github.io/repo/)
[project]
site_url = "https://username.github.io/repository/"

# 根路径部署(如 username.github.io)
[project]
site_url = "https://username.github.io/"

# 自定义域名
[project]
site_url = "https://example.com/"
注意末尾斜杠
site_url 的末尾必须有斜杠 /,否则可能导致路径错误。
优化部署速度
关于缓存
目前,我们不推荐在 CI 系统中使用缓存,因为缓存功能将在我们优化 Zensical 性能时进行修订。
并行构建
如果项目较大,可以考虑并行构建:
- name: Build site
  run: |
    zensical build --parallel
增量构建
对于大型项目,可以使用增量构建:
- name: Build site
  run: |
    zensical build --dirty
常见问题
404 错误
问题:访问网站时出现 404 错误
解决方案:
- 检查
site_url配置是否正确 - 确保 GitHub Pages 已启用
- 检查分支和目录设置是否正确
- 等待几分钟让部署生效
样式丢失
问题:网站样式不正常
解决方案:
- 确保
site_url配置正确 - 检查
use_directory_urls设置 - 添加
.nojekyll文件禁用 Jekyll
自定义域名不生效
问题:自定义域名无法访问
解决方案:
- 检查 DNS 记录是否正确
- 等待 DNS 生效(最多 48 小时)
- 确保 CNAME 文件存在
- 在 GitHub 设置中重新保存域名
构建失败
问题:GitHub Actions 构建失败
解决方案:
- 查看 Actions 日志
- 检查 Python 版本是否正确
- 确保所有依赖都已安装
- 检查
zensical.toml语法
完整配置示例
.github/workflows/docs.yml
name: Documentation

on:
  push:
    branches:
      - master
      - main

permissions:
  contents: read
  pages: write
  id-token: write

jobs:
  deploy:
    environment:
      name: github-pages
      url: ${{ steps.deployment.outputs.page_url }}
    runs-on: ubuntu-latest
    steps:
      - uses: actions/configure-pages@v5
      - uses: actions/checkout@v5
      - uses: actions/setup-python@v5
        with:
          python-version: 3.x
      - run: pip install zensical
      - run: zensical build --clean
      - uses: actions/upload-pages-artifact@v4
        with:
          path: site
      - uses: actions/deploy-pages@v4
        id: deployment
CNAME
example.com
.nojekyll
创建空文件即可(禁用 Jekyll 处理)。
与 Netlify 对比
| 特性 | GitHub Pages | Netlify |
|---|---|---|
| 价格 | 免费 | 免费(有限额) |
| 自动部署 | ✅ GitHub Actions | ✅ 自动 |
| 自定义域名 | ✅ 支持 | ✅ 支持 |
| HTTPS | ✅ 免费 | ✅ 免费 |
| 构建时间 | 较慢 | 较快 |
| CDN | GitHub CDN | 全球 CDN |
| 预览部署 | ❌ 需配置 | ✅ 自动 |
| 环境变量 | ❌ 不支持 | ✅ 支持 |
下一步
- 查看 GitHub Pages 文档
- 考虑使用 Netlify 部署(更强大)
参考资料: